
Vertical Jump – Testing History
In the 1980’s, an Italian researcher named Carmelo Bosco began his career studying muscular mechanics and the effects of pre-stretching on force production. He subsequently developed a series of performance tests, predominantly based around the vertical jump. These are now referred to as the “Bosco Tests” and many would say they represent the epitome of Vertical Jump testing.
Bosco Tests are now used worldwide and are regarded as an easy, and non-invasive way to determine power output and muscular work.
Before Bosco began his research, the most common test used for Vertical Jump assessment was the Sargent Test – where athletes jump up and slap a wall with chalk on their hands to make a mark, then measured to signify jump height. Then, as technology in sports performance continued to expand, mechanical measuring systems like Vertec and the Yardstick device became the commonly used industry practice.
Of course, Bosco understood that there is more to vertical jump than height or maximal reach. What he need was ‘contact time’ and hence his use of a ‘contact or jump mat’
A jump mat is actually nothing more than an electrical switch that recognizes when an athlete is either on, or off the mat. These two physical states are commonly referred to as Contact Time (Ct) and Flight Time (Ft).
Measuring jump height is fairly simple using a jump mat. By applying simple physics, Jump Height is quantified by recording the Flight Time of a jump when the athlete is off the mat.
Given that a jump mat can measure only two parameters, that being total Flight time, and Contact time, let’s look at what we can calculate from these two numbers.
First we will define what these things are
- Flight Time (Ft)
- This is the time your subject is airborne. i.e. the time between leaving and arriving on the mat. It’s crucial that the athlete doesn’t attempt to extend Flight time by holding the feet up before landing. This will extend the Ft and make reading useless.
- It is also worth noting that in the equation used the Flight Time is divided by two, solely because Newtonian physics state that the times to rise, and fall, under the influence of gravity will be equal. If we didn’t take half the Ft, we would have a much larger jump result, which would be incorrect.
- Ft is measured in milliseconds (mS) to ensure good resolution in calculated jump heights
- Contact Time (Ct)
- Is simple the times recorded between successive jumps.
- Ct is measured in milliseconds (mS) to ensure good resolution in calculated Power and RSI measurements
- Note that Ct is something that cannot be measured with a Vertec or Yardstick style product.
CALCULATING JUMP HEIGHT
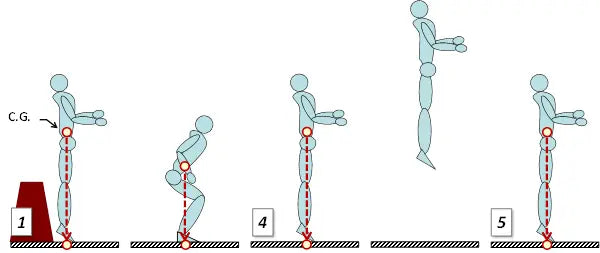
Based on basic Newtonian physics, this measurement method works on three (3) principles: movement of mass, acceleration due to gravity and time. Thus, calculating the DISPLACEMENT OF AN ATHLETE’S CENTRE OF MASS.
Vertec style devices Vs Jump Mats
This is not a competition, both devices have their place in a S &C’s arsenal of tools.
More than once I have been told, “this jump mat gives low readings……. I can jump higher than that”. In fact, if you have been testing your maximal reach on a Vertec or similar, and then use a jump mat, you will see lower values.
Note: Some Jump Mat products add a constant to their calculated Jump Height to compensate for shoulder rotation and give a number closer to what a Vertec might deliver.
Firstly, on a Vertec, everyone uses the swing of their arms, and the inertia they provide to propel themselves upwards, because this is what happens in play. Secondly, you reach as high as you can to tap the highest target possible, bringing shoulder rotation and flexibility into play.
This all makes good sense If you truly want to measure maximal vertical reach. In this case you SHOULD be using a Vertec style device.
“Thus, you are actually measuring maximum reach, not vertical jump, and it will be effected by both the inertial assistance your arms give you and the shoulder rotation you can achieve in reaching overhead”.
Methods
Ouch—Straight leg landing??
Clearly as you read on, you’ll learn that Bosco insists that landing straight legged is required for test validity.
We all know that landing in an extended, straight leg position, with knees locked is dangerous and counters the training of many professionals in the industry of landing in a safer, bent leg, softer position while decelerating.
Bosco’s description of landing ‘straight legged’ is very general. And in effect, a description defining “landing with legs extended, toes first, and ready for normal flexion on landing” would be a better description. With this in mind validity is maintained, and your athletes better understand the technique required.
As a coach it’s very easy to observe if someone is trying to extend flight time to get a better jump and give correctional instruction as to the methodology of the test .
BOSCO Jump Tests
Bosco prescribes a few very different protocols using a jump mat:
-
Squat Jump (single jump)
- Athlete starts from a position where knees are bent at 90 degrees
- Hands remain on hips through the entire jump (these graphics shows arms up at 90 degrees, which is not ideal)
- Athlete moves upwards, accelerating and rapidly extends his or her legs
- Landing must occur with legs in a straight-leg, fully extended position

-
Countermovement Jump (single jump)
- Similar to the Squat Jump, but the athlete drops from a standing position
- This introduces Elastic component to the test
- Results will be higher than a Squat Jump
Image from http://smartlifting.org/wp-content/uploads/2014/07/clip_image0081.png

-
Drop Jump (single jump)
- The Drop Jump follows the same positional protocols as earlier jumps described, but introduces an elevated start position
- Dropping off a box brings heightened elastic moments and often a deeper jump
- Again, results will be higher than the static Squat Jump or the Counter-movement jump due to greater elastic contribution to the movement pattern

Technology
There are many methods to measure vertical jump.
Below are descriptions and pros & cons of each type of the common measurement systems.
-
Vertec
- The Vertec is perhaps the most common device for measuring vertical reach. As can be seen from the Bosco methods above, it actually measures a different metric – that being ‘ultimate reach’. Adopted widely in the US, probably because of the prolific nature of Basketball and Football, where athletes need to grab or catch a ball overhead, it gives the ability to reach for that target well above the head.
- The video found here shows a similar product ‘Yardstick’ in use
- It should be noted that mechanical device measurements will be on average 11cm or almost 5” higher than a comparable Counter Movement jump using Bosco’s method on a contact mat . *Research conducted by Dr. Warren Young of University of Ballarat Vic in Australia shows a strong correlation between results of these two tests as an indicator of lower body strength EVEN THOUGH THE HEIGHTS ARE DIFFERENT.
-
Pros
- Mechanical & Simple
- Well accepted
- Only (1) device required to successively measure many athletes
- Low cost
-
Cons
- Not overly portable
- Not suitable for successive jumps
- Cannot measure Contact Time
- Cannot Estimate Power
- Cannot Calculate Reactive Strength Index (RSI)
- Does not internally record results
-
Jump Mats
- Jump Mats use basic switches measuring athlete time off and on the mat
- Contact mats measure the time the subject is on the ground (Contact time – Ct) and the time the subject is in the air (Flight Time – Ft)
-
Pros
- Contact Time which allows reactive strength measurements
- Measures the true displacement of Centre of Mass of the athlete
- Allows estimation of power through published peer researched methods – Harman, etc.
- Allows Multiple jumps
- Portable
- Good for Fatigue testing
- Allows electronic recording of data
- Quick testing of a large group is possible
- Medium cost
-
Cons
- The reaction time of the switch to the de-weighting of the athlete can have a detrimental effect on measured contact time if not designed properly.
- Does not measure ultimate reach
- Can be ‘cheated’ if the athlete extends Flight time by bending knees before landing.
-
Accelerometer based systems
- The advent of small MEMS based accelerometers has resulted in a plethora of devices for measuring movement. Vertical jump is an obvious candidate for these devices.
- These devices are small and are attached to waist of the athlete, close to the center of mass
- Using the recorded acceleration wave-forms and the ground impact allows measurement of Contact time – Ct
-
Pros
- Allows acceleration measurement BEFORE the athlete leaves the mat.
- Small, lightweight
-
Cons
- Cost of implementing these devices across a large testing group is high
- Data download can be tedious
- Management of multiple devices, can be tedious, e.g. Charging, data download etc.
-
Optical-Based systems
- An array of Infrared transmitting diodes and a matching receiver arrays are setup transversely across the jump area. This creates a ‘horizontal ‘curtain’ of light. Any interruption of these beams indicates a movement. The most commonly known product is ‘Optojump’ from Microgate (Italy)
- Accuracy is very high, in fact, we validate our ezejump product against Optojump and are happy to say there is no significant difference between the two products
-
Pros
- Can measure left/right foot placement in 1 direction
- Can be extended over many metres for gait or sprint analysis
- Quick testing of a large group is possible
-
Cons
- Very expensive
- Requires a PC connection which limits mobility
Conclusions
All the above systems are valid tests for measuring vertical jump, however some are more suited for specific outcome requirements.
If you are looking only for a measure of maximal reach, then a mechanicale product will suffice.
But, if you are looking for a much wider assessment and more comprehensive data that better explains an athlete’s performance including: explosivity, power and fatigue, then you will be better served with a Jump Mat device that can measure the two (2) necessary variables of Contact Time and Flight Time.
-
Explosivity
- With both Contact Time and Flight Time, jump height can be calculated. Then, the ratio between Jump Height and Contact Time can be used to provide the Reactive Strength Index (RSI) which shows athletes’ ability to change quickly from an eccentric to a concentric contraction and their ability to develop maximal forces in minimal time.
- Consider that two (2) athletes – A & B – might achieve the same jump height. Both may be the same weight and height. However, if athlete A generates power in less time, which is observed as a shorter Contact Time, the jump was in fact more ‘explosive’ than athlete B … thus the ‘reactive strength’ is higher. This may be an indicator of a range of factors from Fast Twitch muscle fiber percentage to better plyometric training.
-
Power
- Given Contact Time (Ct), Flight Time (Ft) and an athletes’ mass, Power and Peak Impulse Power can be estimated using published algorithms.
- Although these numbers are estimated and may not match power calculated from force plate testing, the results are repeatable and come at a much lower equipment outlay cost than a Force Plate.
-
Fatigue
- Many research papers offer the suggestion that Drop tests and multiple Counter Movement Jump tests can give an indication of general athlete fatigue or overtraining. Some elite teams use such a test on a daily basis to monitor this aspect of their athletes’ training and performance load to avoid over training.
- Acknowledgements: Graphics borrowed from http://smartlifting.org/2014/07/il-metodo-di-bosco- per-il-calcolo-dellaltezza-e-della-potenza-meccanica-del-salto-finale
Share:
A Curious Explanation of Weighted Jump Techniques